AI watch photography: wristwatches on the wrist, without a photoshoot
AI watch photography turns one photo of a watch into a wrist shot, a styled product shot or a full lifestyle photo. Upload the watch, choose Studio for product and wrist angles with no full model in frame, or Lifestyle for a model wearing it with a styled outfit. Wristwatches, smartwatches, dress watches and chronographs all run through the same flow, and straps get their own clasp and buckle close-ups.
Try it with your own product10 free photos, no card. From $0.33 per day. Photos as low as $0.25 each.
What you can shoot
Wristwatches, smartwatches, dress watches and chronographs, plus close-ups of straps, clasps and buckles. The same upload feeds the product shots, the wrist shots and the lifestyle photos.
A steel bracelet diver, a leather-strapped dress watch, a chronograph, a smartwatch, a field watch or a fashion quartz all start the same way: one photo of the watch on a plain surface.
The studio library is split into two groups. Product Shots place the watch on a surface with no person in frame — Concrete Surface, Natural Wood, Vintage Books, Fabric Textile, Water Glass, or the Classic Diagonal laid flat on white. Wrist Shots put it on an arm: Wrist Side Profile, Wrist Front View, Wrist with Sweater, Wrist Front Clean, Clasp Detail and Buckle Close-up.
The lifestyle poses are the third group, built per model gender: Coffee Morning, Denim at Table, Arms Crossed, Watch Adjust, Desk Confident, Business Check, Fitness Stretch, Professional Walk and more. In Studio you can pick up to four styles in one run, each a separate photo costing one credit; in Lifestyle it is one pose, one photo, one credit per run.
- WristwatchesThe wrist side profile and front view, which is what buyers want to see.
- SmartwatchesWrist shots that show the case and band worn; state the case size beside the image.
- Dress watchesVintage books, fabric and wood surfaces for the styled product shot.
- ChronographsThe classic diagonal and clean front angles, where the sub-dials read.
- Straps and braceletsClasp detail and buckle close-ups, plus a wrist shot with a sweater cuff.
How it works
Upload the watch photo, pick Studio or Lifestyle, then choose your angles — or a model and a pose — add a background, review, and generate.
- Upload your watch photo. One photo of the watch on a plain surface. Fill the frame: a watch is small, and the more pixels the dial occupies, the more detail the generator has to work from.
- Pick the shot type. Two cards appear under the upload: Lifestyle Shot, a model wearing the watch with a styled outfit, and Studio Shot, the product and wrist angles with no full model in frame.
- Studio: choose product or wrist angles. The angle grid is grouped into Product Shots and Wrist Shots. Pick up to four styles in one run — the app says “Select up to 4 styles for variety!” — and each one comes back as a separate photo costing one credit.
- Lifestyle: choose the model, then the pose. Women or men, filtered by hair colour, age, ethnicity, size and style, or your own uploaded model. Then pick the pose, or switch on Tryly Vision and let it choose the pose for you.
- Background, review, create. Studio, outdoor, lifestyle and abstract backgrounds sit in tabs, and you can save your own. The review step lists every choice and the credit cost before anything is spent, then the finished photos land in your gallery to check and download.
On a model or on its own
Three ways, not two. The watch can sit alone on a styled surface, sit on a wrist with no full model in frame, or be worn by a model in a full lifestyle photo.
The product shots are the ones a catalogue page needs: the watch on concrete, on natural wood, on a stack of vintage books, on fabric, beside water and glass, or laid out on the classic diagonal. No person, no hands — just the watch, styled.
The wrist shots are the middle ground. The wrist side profile shows the case from the side, the front views show how the dial sits, the sweater-cuff shot shows it under a sleeve, and the clasp and buckle close-ups show the part of the strap buyers ask about. None of them is calibrated to your case size — there is no case-size input in the app — so list the diameter and lug-to-lug beside the image.
Lifestyle mode is the full photo: a model, a background, an outfit, and the watch worn through a scene — morning coffee, a desk, a walk, a stretch at the gym. That is the campaign image, and it is the one a flat product photo cannot stand in for.
What a watch listing needs, mapped to the angle library
The angle names below are the ones in the app. Where a shot is not in the library, keep your own photo.
| Listing shot | Angle in Tryly | Group |
|---|---|---|
| Clean front, dial readable | Wrist Front Clean, Classic Diagonal | Wrist Shots / Product Shots |
| Styled product shot | Concrete Surface, Natural Wood, Vintage Books, Fabric Textile, Water Glass | Product Shots |
| On the wrist | Wrist Side Profile, Wrist Front View, Wrist with Sweater | Wrist Shots |
| Strap, clasp and buckle | Clasp Detail, Buckle Close-up | Wrist Shots |
| Worn in a scene | A lifestyle pose, e.g. Coffee Morning, Desk Confident, Professional Walk | Lifestyle mode |
| Caseback | Not in the library — keep your own photo | — |
| Macro of the dial | Not a dedicated angle — check the dial at full size on Wrist Front Clean | — |
Up to four styles per Studio run, one credit each; one pose per Lifestyle run.
How the shots are laid out
One source photo, then the styled product shot, the wrist shot and the strap close-up.
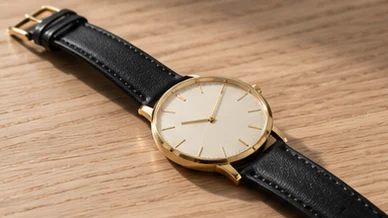
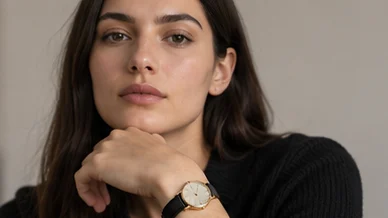
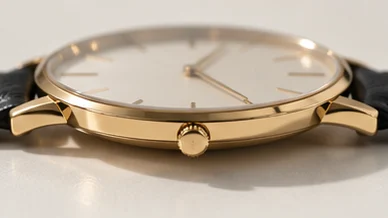
Dress watch: on natural wood, worn portrait, case close-up
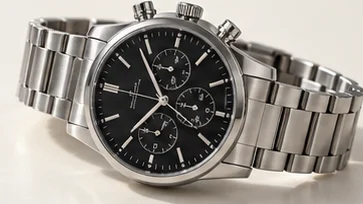
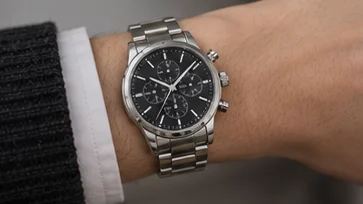
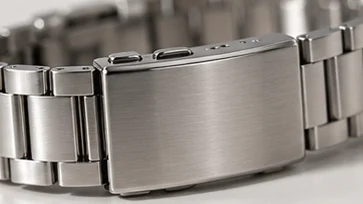
Chronograph: source, wrist side profile, clasp crop
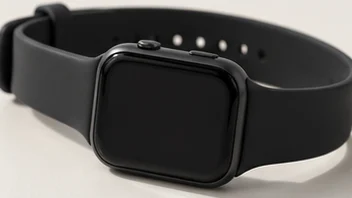
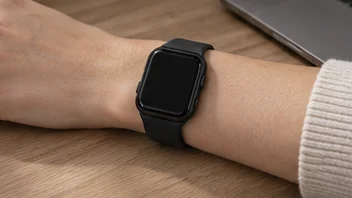
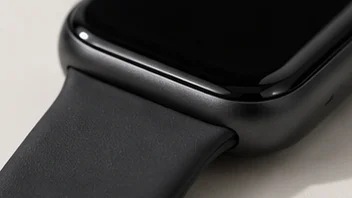
Smartwatch: source, wrist front view, strap crop
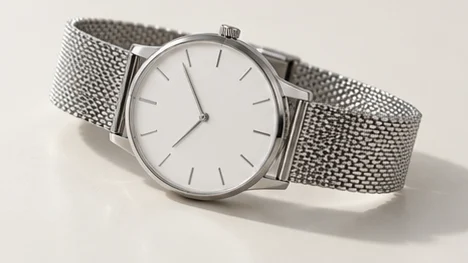
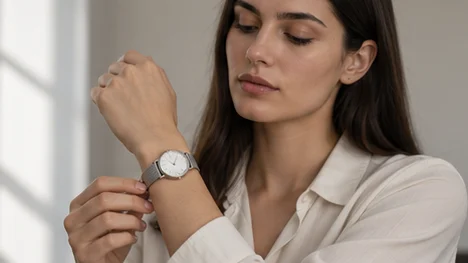
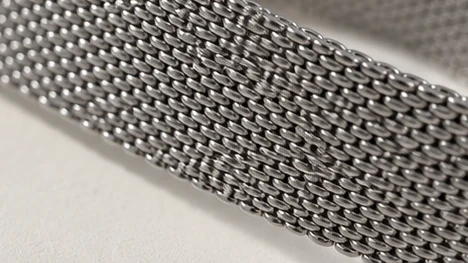
Wristwatch: source, lifestyle pose, mesh strap crop
What your photo needs
One sharp photo of the watch on a plain background, filling as much of the frame as you can. A phone in daylight works, as long as the dial is in focus.
Lay the watch on a plain surface with nothing else in shot, strap open or gently curved so the whole piece is visible, and the dial facing the camera. Get close and tap to focus on the dial: the hands, the markers and the text at twelve o’clock are the details you will be checking in the result, so give them the pixels.
Watches are mirrors on two surfaces at once — the crystal and the case. A hard flash puts a white blob across the dial and blows out a polished bezel, which leaves nothing for the finished photo to work from. Shoot in soft, even light and tilt the watch until the reflection falls away from the dial.
A good source photo of a watch
What to get right before you upload — the wrist and product shots are built from what the dial, case and strap show.
- Straps and lugs fully visible: strap open or gently curved, nothing cropped at the lugs.
- Dial facing the camera and sharp, with the brand text, markers and any date window readable.
- No glare on the crystal or the case: soft light, and tilt until the reflection leaves the dial.
- Crown side visible, so the case profile and the crown are in the source.
- A plain, uncluttered background — no watch box, stand or second watch in shot.
- Camera square to the dial rather than at an extreme angle that distorts the case shape.
- Neutral lighting rather than a stylised colour cast, so the case metal reads true.
- The bracelet or strap laid out so the clasp or buckle is visible — those get their own close-ups.
On the file itself the requirements are loose. JPG, PNG, WebP, HEIC, HEIF and AVIF are all accepted, up to 50 MB per image. Anything under roughly 1024 pixels on its shortest edge still uploads, but you are warned that a higher-quality photo gives a better result, because detail the input never captured cannot be invented later.
Where it struggles
The dial is the part to check most closely. Brand text, sub-dial numerals, date windows and fine indices can come back changed, and polished steel reflects whatever is around it.
Text on the dial first. A brand name under twelve, a model name above six, the numerals on a chronograph sub-dial and the digits in a date window are small, and small lettering can come back reshaped or misspaced. Never publish a watch photo without looking at the dial at full size.
Reflective metal next. A polished case or bezel mirrors its surroundings, so tone and brightness can shift between your photo and the finished shot, and a brushed finish can come back smoother than it is. Bracelet links can merge, and a fine mesh strap can lose its weave.
Hand positions and complications are generated, not copied precisely — so the time shown, the alignment of sub-dials and the exact look of a moonphase can differ from your original. If the time on the dial matters to your brand, check every photo before it goes live.
Exact colour is not guaranteed either: a particular blue sunburst or a specific shade of rose gold can drift. Each attempt costs a credit, including the ones you throw away, so run your most detailed chronograph first on the free photos.
Check before you publish
Compare the finished photo with your source photo at full size. These are the details to inspect on a watch.
- Dial text, numerals and date windows at full resolution; fine details can change.
- Hand positions and sub-dials: the time shown and the alignment of complications are generated, so compare with your original if it matters.
- Indices and markers: count them, and check applied markers have not become printed ones.
- Case and bezel: shape, finish — brushed or polished — and the crown on the correct side.
- Bracelet and strap: link count and mesh weave along the whole length; clasp and buckle on the close-ups.
- Colour of the dial and the case against the real watch in daylight.
- Scale on the wrist: a composition, not a measurement — state the case diameter and lug-to-lug in the listing.
Open the finished photo at full size rather than judging the thumbnail. If a detail is wrong, regenerate that photo; a retry costs one credit, the same as the first attempt.
Choosing the model
500+ models to pick from, or upload your own model or yourself. The model step is the same in every mode: filter the library, or add your own person once and use them for the whole catalogue.
Switch between women and men, then narrow the library by hair colour, age, ethnicity, size and style until you have the face that fits your brand. Heart the ones you keep coming back to and they sort to the front next time.
If you would rather use a real person, “Add Your Model” takes a photo of your own model — or of yourself — and your watches are photographed on them instead. The same library powers the AI clothing model library, so clothing and accessories can share one face across a whole store.
What it costs
From $0.33 per day. Photos as low as $0.25 each.
$0.33 per day is the Starter plan billed annually — $119.97 a year for 300 photos. $0.25 each is the Max annual 10,000-credit pack at $2,499.99 a year.
Billed monthly, Starter is $20 for the default 25-credit pack, $35 for 50 credits or $55 for 100 credits.
10 free photos, no card.
One credit is one photo, and the review step shows the credit cost before anything is spent. Retries cost a credit too, including the attempts you throw away, which is the honest reason to run your hardest watch first on the free photos.
Questions watch sellers ask
The questions watch sellers ask most, answered against what the product actually does today.
Can I get a wrist shot without hiring a hand model?+
Yes, and it is a whole group of its own. The Wrist Shots set covers Wrist Side Profile, Wrist Front View, Wrist Front Clean, Wrist with Sweater, Clasp Detail and Buckle Close-up — an arm in frame, no full model needed.
Can I get the watch on its own, with no person at all?+
Yes. The Product Shots set styles the watch on a surface with nobody in the frame: Concrete Surface, Natural Wood, Vintage Books, Fabric Textile, Water Glass, or the Classic Diagonal laid flat on white.
Will the text on the dial be correct?+
Check it at full resolution on every photo. Brand text, sub-dial numerals and date windows are small, and fine details can change. Compare the dial with your original before you publish.
Will the case look the right size on the wrist?+
Treat the wrist shots as compositions, not measurements. There is no case-size input in the app, so nothing calibrates a 36 mm case against a 44 mm one on the wrist. Put the case diameter, lug-to-lug and thickness in the listing text, and use the wrist side profile to show the case shape rather than to imply a size.
Does it show the strap and the clasp?+
Yes. Clasp Detail and Buckle Close-up are their own angles, and the Wrist with Sweater shot shows how the watch sits under a sleeve. Very fine mesh bracelets can lose their weave, so check those close-ups.
How many watch photos can I make in one run?+
Up to four in Studio mode — the app says “Select up to 4 styles for variety!” — and each one comes back as a separate photo costing one credit. Lifestyle mode is one pose, one photo, one credit per run.
Does it get the time and the sub-dials right?+
Not guaranteed. Hand positions and complications are generated rather than copied precisely, so the time shown and the alignment of sub-dials can differ from your original photo. If the dial time matters to your brand, review every image.
Can I use the watch photos on Shopify, and do they meet its image limits?+
Photos made on a paid plan can be used on your store, in ads and on social media. Shopify's own documentation says product images can be any size up to 5000 × 5000 px or 25 megapixels, must have a file size smaller than 20 MB, and that 2048 × 2048 px usually displays best for square product images, with a consistent aspect ratio across your main images (https://help.shopify.com/en/manual/products/product-media/product-media-types, checked 17 September 2026). Check the pixel size of the file you download against that before you upload it. Amazon and Etsy publish their own image rules for sellers; read them in your seller account before you list.
What does a traditional watch shoot cost?+
Shopify's product photography pricing guide (Shopify Staff, published 27 January 2026, https://www.shopify.com/blog/product-photography-pricing) puts product photographers at $500 to $3,000 per day, with per-image pricing between $50 and $350. Those are general product-photography rates, not watch-specific ones. On Tryly one credit is one photo. $0.33 per day is the Starter plan billed annually — $119.97 a year for 300 photos. $0.25 each is the Max annual 10,000-credit pack at $2,499.99 a year. Billed monthly, Starter is $20 for the default 25-credit pack, $35 for 50 credits or $55 for 100 credits. A worked budget for a whole collection is at tryly.ai/blog/true-cost-of-fashion-photoshoots.
Sources
The only outside figures on this page come from the pages below, fetched on the date shown. Product facts come from the app itself.
- Shopify Help Center, "Product media types" — image size limits and the recommended size (checked 17 September 2026)
- Shopify, "Product Photography Pricing Factors: How Much Photos Cost (2026)", Shopify Staff (published 27 January 2026, checked 17 September 2026)
Other things you can photograph this way
The same upload-and-generate flow covers bags, jewellery, shoes, hats and watches, each with its own angles and poses.
- AI bag photography for handbags, totes and crossbody bagsHandbags, totes, shoulder bags, crossbody bags, clutches and backpacks on a model.
- AI jewelry photography for necklaces, earrings and ringsNecklaces, pendants, chains, earrings, bracelets and rings worn and shot close up.
- AI shoe photography for sneakers, heels and bootsSneakers, heels, boots, sandals, loafers and flats, on foot or as studio product shots.
- AI hat photography for caps, beanies and bucket hatsCaps, beanies, bucket hats, fedoras and wide-brim hats on a model or on their own.
- On-model photography for a whole clothing collectionTen garments on one AI model, flat photo to on-model to close-up.
- Ghost mannequin photos for clothingA garment holding a worn shape with no model, mannequin or hanger in the frame.
10 free photos, no card. From $0.33 per day. Photos as low as $0.25 each.
$0.33 per day is the Starter plan billed annually — $119.97 a year for 300 photos. $0.25 each is the Max annual 10,000-credit pack at $2,499.99 a year.
Try it with your own product